
Windows Kernel Exploitation Humla by Ashfaq Ansari
This write-up summarizes a workshop/humla conducted by Ashfaq Ansari on the basics of various kinds of attacks available for exploiting the Windows Kernel as of this date. It describes and demonstrates some of the very common techniques to illustrate the impacts of bypassing Kernel security and how the same could be achieved by exploiting specific flaws in kernel mode components. A knowledge of basic buffer overflow exploits through user mode applications is a plus when understanding kernel exploitation and memory issues.
Humla Champion: Ashfaq Ansari
Post Author: Neelu Tripathy
Workshop: Null Humla
Date: 18th April, 2015
Venue: Mumbai, BKC
Driver: HackSys Extreme Vulnerable Driver
Introduction
A plethora of attacks have illustrated that attacker specific code execution is possible through user mode applications/software. Hence, lot of protection mechanisms are being put into place to prevent and detect such attacks in the operating system either through randomization, execution prevention, enhanced memory protection, etc. for user mode applications.
However little work has been done on the Kernel end to save the base OS from exploitation. In this article we will discuss the various exploit techniques and methods that abuse Kernel architecture and assumptions.
Initial Set Up
All the demonstrations were provided on Windows 7 x86 SP1 where a custom built HackSys Extreme Vulnerable Driver [intentionally vulnerable] was exploited to show Kernel level flaws and how they could be exploited to escalate privilege from Low Integrity to High Integrity.
The below set up was used:
- Windows 7 OS for Debugger and Debugee machine
- Virtual Box
- HackSys Extreme Vulnerable Driver
- Windows Kernel Debugger – WinDBG
Note: set the create pipe path in debugger as \.\pipe\com1 and enable the same in debugee.
Windows Kernel Architecture
Before moving to exploitation let’s take a look at the basic architecture of the Kernel and modus operandi for process based space allocation and execution for Windows. The two major components of the Windows OS are User mode and Kernel mode. Any programs executing, will belong to either of these modes.

HAL: Hardware Abstraction Layer – Is a layer of software routines for supporting different hardware with same Software; HalDispatchTable holds the addresses of some HAL routines
Stack Overflow
A stack overflow occurs when there is no proper bound checking done while copying user input to the pre-allocated buffer. A memcpy() operation was used by the vulnerable program which copies data beyond the pre-defined byte buffer for the variable.
In the example below, we are using a program that uses the memcpy() function.

At first we write the buffer with a large enough value so as to overflow it and overwrite the RET (return) address. This shall give us control as to where we want to point for the next instruction. We proceed by using all A’s and successfully crashing the stack. However, to find the exact offset of the RET overwrite. This can be done, by sending a pattern and finding the offset of RET overwrite.
For this purpose we use a unique pattern and provide it as the input using our exploit code. In the debugger, we find the exact offset as shown below:

As evident from above, the EIP has its offset at 72433372 (Read backwards – Little Endian). For our unique pattern of characters used as input, this pattern and hence the EIP offset is at 2080.
In our exploit code, we define the shellcode and allocate to ‘ring0_shellcode’ as below and

Add its address to our buffer as below. Here we keep the payload in user mode and execute it from kernel mode by adding the address of ring0 shellcode to the buffer.
Note: In the first step, we find the address of our shellcode in memory using an interesting feature of Python i.e. ring0_shellcode_address = id(ring0_shellcode) + 20 //id(var) + 20
Following this, we place the address to our shell code at the EIP offset found from the previous step. On execution, this shellcode [for cmd.exe] is called and spawns the shell with system privilege as shown below:

Stack Overflow Stack Guard Bypass
A protection mechanism to defeat stack overflows was proposed as a Stack Guard. With the implementation of this method, an executing function has two main components such as – the function_prologue and the function_epilogue methods. Stack Guard is a compiler feature which adds code to function_prologue and function_epilogue to set and validate the stack canary.
Function prologue


Function Epilogue

Referring to the program above, we find that every time we overwrite the stack in the conventional way, we will have to overwrite the Stack Cookie as well. So unless we write the right value in the canary, the check in the epilogue will fail and abort the program.
Workaround
To exploit this scenario of Stack Overflow protected by Stack Cookie, we will exploit the exception handling mechanism. As the exception handler are on the stack and as an attacker, we have the ability to overwrite things on the stack, we will overwrite the exception handler with the address of our shellcode and will raise the exception while copying the user supplied buffer to kernel allocated buffer to jump to our shellcode.

Executing INT 3 instruction after bypassing Stack Guard as per the exploit code below:


Arbitrary Overwrites
This is also called the Write What Where class of vulnerabilities in which an attacker has the ability to write an arbitrary value at arbitrary memory location. If not done accurately, this may crash (User Mode)/may BSOD (Kernel Mode).
Typically there may be restrictions to
- Value – as to what value can be written
- Size – What size of memory may be overwritten
- And sometimes one may only be allowed to increment or decrement the memory
These kind of bugs are difficult to find as compared to the other known types but can prove to be very useful for an attacker for seamless execution of malicious code. There are various places where the attacker value can be written for effective execution such as HalDispatchTable+4, Interrupt Dispatch Table, System Service Dispatch Table, and so on.
Below is a sample WRITE_WHAT_WHERE structure containing the What-Where fields:

Since the vulnerable function allows us to define the What and Where attributes in the structure, we assign the address of pointer to our own crafted shellcode to ‘What’ and address of HalDispatchTable0x4 to ‘Where’ as shown below:

We have halted the program in the kernel debugger to examine the HalDispatch Table function address as shown below:
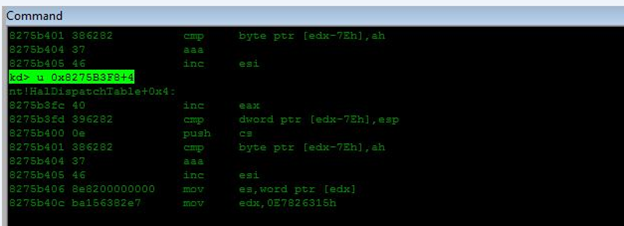

After triggering the exploit, we examine the memory in the debugger to find that the kernel has written the address of the shellcode at HalDispatchTable+4 which then gets executed. The below diagram shows program halted at the breakpoints as per the code.


Going further, the shellcode provided in the payload will be executed due to the arbitrary overwrite condition.
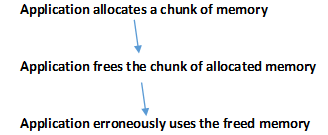
Use After Free Bug Exploitation
When a program uses allocated memory after it has been freed, it can lead to unexpected system behaviour such as exception or can be used to gain arbitrary code execution. The modus operandi generally entails:
At some point an object gets created and is associated with a vtable, then later a method gets called by program. If we free the object before it gets used by the program, it may crash when program when it tries call a method.
To exploit this scenario, an attacker grooms the memory to make predictable pool layout. Then, allocates all similar sized objects. Next, the attacker tries to free some objects to create holes. Then, allocate and frees the vulnerable object. Finally, attacker fills the holes to take up the allocation where the vulnerable object was allocated. Such vulnerabilities are difficult to find and exploit and certain considerations are necessary such as:
- The pointer to the shellcode has to be placed in the same memory location as the freed vulnerable object memory location.
- The hole size created by pool spray has to be of the same size as the one freed.
- There should be no adjacent memory chunks free to prevent coalescing.
Coalescing: When two separate but adjacent chunks in memory are free, the operating system con-joins these smaller chunks to create a bigger chunk of memory to avoid fragmentation. This process is called Coalescing and this would make harder to exploit Use After free bugs since then, memory manager won’t allocate the designated memory and the chances for the attacker to get same memory location is very less.
Sample vulnerable C functions depict Use After Free bug in a kernel driver are given below:
Below example demonstrates such an exploit, where we have the debugee/target running as Guest. To trigger the Use After free bug we will have to first allocate the vulnerable object on the Kernel Pool, free it and force the vulnerable program to use the freed object.

Following this, we free the objects to create holes. Finally, we fill all the freed chunks to take up the memory location where the vulnerable object was created. This takes some time as for the purpose of demonstration this was done around 100 times. We all reallocate the UaF object with a FakeObject.


Meanwhile, the chunks have been filled by our/attacker controlled/fake object. If we look at the pool layout at this moment, then we can see that we have successfully reallocated the holes that we had created.

Finally the code triggers the use of the freed UaF object and hence the bug. As per the exploit code it spawns a shell with SYSTEM privileges as shown below:

Token Stealing using Kernel Debugger
Another interesting phenomenon that can be demonstrated using the Kernel flaws is privilege escalation using process tokens.
In the below section we illustrate how an attacker can steal tokens from a higher or different privilege level and impersonate the same to elevate or change the privilege for another process. Using such vulnerabilities in the Kernel, any existing process can be given SYSTEM level privileges in spite of some of the known Kernel protections in place to avoid misuse such as ASLR, DEP, Safe SEH, SEHOP, etc.
Below is a step by step illustration for the ‘Guest‘ user that represents the guest having Low privilege. We will use kernel debugging session to escalate the rights of a cmd.exe process from Administrator to SYSTEM.
Use the debugger to find the current running processes and their attributes such as below-
For cmd.exe
For SYSTEM
Now that we know the token for the system process, we can switch to the cmd.exe process and find the location for the token for this process.
- Get the structure at KPCR from the address found above
- Get address of CurrentThread member (KTHREAD) at the +0x120 Offset
- Get address of ApcState member (KAPC_STATE). It contains a pointer to KPROCESS
Get address of Process member (KPROCESS). It contains the Token value and is at an offset +0x40 from the KTHREAD base address.

- Get Token member offset from EPROCESS structure. KPROCESS is the first structure of EPROCESS
- Get Token value
Actual Token value by ANDing last 3 bits to 0 = 0x953b6037 » 0x953b6030 Now replace the current process token with SYSTEM token.

Soon as we replace the token we are assigned the SYSTEM token and the privileges that come with it. The same was verified as below in the victim machine:

